Adapted from Biotechnology Aug. 2008 [slightly revised, June 2010] BIO-9, How to Cultivate Indigenous Microorganisms
Pre-made EM bokashi can be purchased, but micro-organism may also be collected from the local environment. These free-of-charge organisms may be better adapted to local conditions. The collection process takes approximately 4–5 days in cooler weather (that’s subtropical cool – about 68°F, 20°C) and 3–4 days under warmer conditions (>68°F, 20°C).
To determine the best site for collecting micro-organisms, ask yourself, “Where is the best soil on my property?” In my case, the best soil is under the leaf litter in our forest remnant. This soil is loamy and a rich chestnut brown. But I also collect from beneath the pasture and near the seasonal creek, combining microbes from multiple sites to produce a robust culture. Do not collect micro-organisms in the vicinity of diseased plants.
Collecting Soil Micro-organisms
Collection Materials
- a small wooden box, 12 x 4 x 4 inches, preferably made of a rot resistant wood such as cedar. Be sure not to construct the box from pressure treated wood. A heavily perforated plastic take-away container is a workable substitute.
- steamed white rice – cheap grocery store rice will suffice. (wash the rice before steaming and collect the wash water for later use).
- white paper towels, enough to cover the wooden box
- two to four large rubber bands
- a sheet of clear plastic, large enough to completely cover the wooden box
- 1⁄4-inch mesh wire screen large enough to completely cover the wooden box with a 2 inch margin.
-
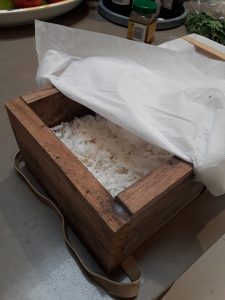
- Fill the wooden box with 3 inches of steamed rice.
- Cover the box with white paper towels, being careful not to let the towels touch the rice.
- Leave an inch or so of air space between the rice and the paper towels.
- Secure the paper towels to the box with the rubber bands.
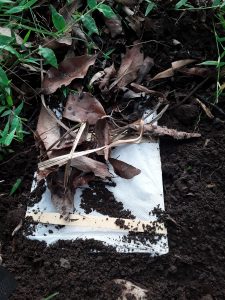
- Bury the box in the soil at least 2 inches deep. Cover the box with fallen leaves from the harvest location.
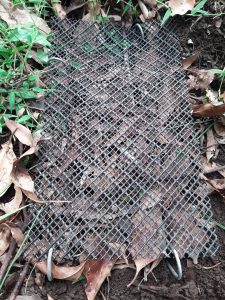
- Cover the top of the box with screen to prevent animal intrusion. Anchor screen with garden stakes.
- Top the wire with a sheet of clear plastic to protect the box from rain. Anchor the plastic sheet on all sides with small rocks.
- In 5 days, check for growth. The rice should be covered with white mold.
- If mold growth is sparse, re-cover and incubate an additional 2–3 days before re-checking.
Culturing Soil Micro-organisms
Culture Materials
- Moldy rice filled wooden box
- Large metal bowl
- Brown sugar
- Clay pot
 1. On a kitchen scale, tare (zero) the large bowl.
2. Transfer the moldy rice from the wooden box to the bowl with a spoon.
3. Record the weight of the rice.
4. Wearing gloves, hand-knead an equal weight of brown sugar into the rice until the sugar and rice have the consistency of gooey molasses.
5. Fill a clean clay pot two-thirds full with the 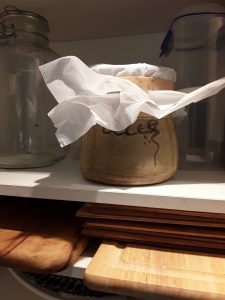 rice/sugar mixture.
6. Cover with a paper towel and secure the towel with rubber bands.
7. Store the pot in a cool area away from direct sunlight for 7 days, allowing fermentation.
Collecting Micro-organisms from the Air
Collection Materials
- Rice-washing water (see above)
- Cow’s milk (preferably raw but at least organic)
- Jagerry, raw or brown sugar
- Glass or clay jar
- Paper towel or cheese cloth
- Rubber band or string
- Pour rice washing water into the jar, 15 to 20 cm deep.
- Cover the mouth of the jar with a paper towel or cheese cloth. Secure with rubber band or string.
- Leave in shade or pantry (23 – 25 degrees C) for three days.
- Add 3 times the volume of milk to the rice water.
- In 3 to 4 days, the jar will have three divided layers
- a) floating floculant material
- b) clear liquid and
- c) bottom debris.
- Remove the floating material with a slotted spoon.
- Strain yellow liquid from other debris.
- Store in a lidded bottle or jar and refrigerate.
Preparing Bokashi Flakes at Home
Supplies
- Wheat bran – 20kg (44lb)
- Liquid or rice based microbe culture
- Molasses – 185 ml (3/4 cup)
- Water – 5 gallons
- Plastic storage box with lid – 100 L (about 800 x 500 x 400mm or 30 x 20 x 15 inches)
- Large metal bowl
- Serving spoon
- Large ladle
- Large dry goods scoop
- Plastic garden gloves
1. Fill a 5 gallon bucket with water (preferably non-chlorinated water or let the bucket sit overnight so chlorine evaporates).
2. Ladle water into the large bowl, filling the bowl halfway. Add molasses to water. Stir to dissolve. Add liquid bacterial culture and/or spoon rice based culture into liquid, breaking up clumps with gloved fingers. Pour bowl’s contents into the 5 gallon bucket.
3. Pour or scoop a 3 inch layer of bran into the plastic box. Ladle liquid onto the bran mixture and mix by hand. Continue adding liquid until the bran holds its form after being squeezed but does not drip liquid.
4. Add an additional three inch layer and moisten with the liquid until the box is full. Be sure that all the bran in the corners and along the sides of the box is well mixed.
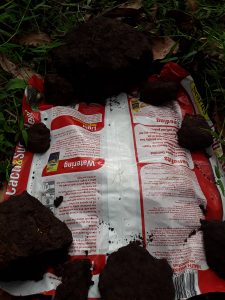
5. Cover the bran with a plastic sheet cut to size (an empty fertilizer bag works well for this purpose). Weigh down the plastic sheet with something heavy but not thick enough to prevent the lid from sealing.
6. Place the box somewhere warm and out of the way. Let it ferment for a minimum of two weeks. Longer is fine. When fermentation is complete, some colonies of white mold will be visible on the bran. The white colonies are good. Black or green mold is not desirable and indicates some air entered the container or the bran was too moist. Dispose of any black or green colonies.
7. You can use the bokashi for composting without drying for up to 2 weeks. Store in a closed container. Air dry for long-term storage.
8. To air dry, spread a large plastic sheet in an area protected from rain such as a garage or porch.
9. Turn out the plastic box of bokashi onto the plastic sheet and rake the bran to form a thin layer. Break up any clumps.
10. Cover the bran with a sheet of fruit netting to discourage animal intrusion. Lay boards on the edges of the netting.
11. Every day, rake the bokashi and break up any clumps.
12. Drying time depends on the season and climate. After the bokashi is dry to the touch, pack it into the plastic storage box and store in a cool dry place.